Build your own dry composting toilet - Box composting toilet
Share


The do-it-yourself camping composting toilet
Built by Manfred for his camping tours through Europe
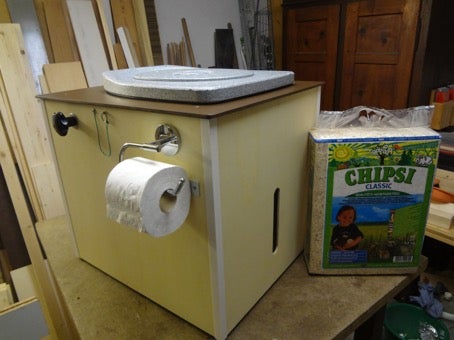
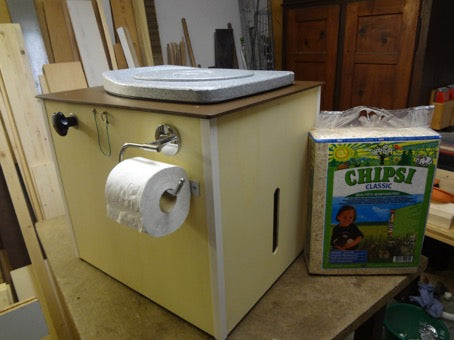
This time I would like to introduce you to Manfred's self-built camping toilet. This toilet is also a typical composting toilet.
Manfred designed it so that he can use it both in his caravan and on his tent tours.
It is important for Manfred to be able to use the toilet as uncomplicated as possible. He no longer wanted to be tied to waste disposal stations. He also wanted to be able to stay a few days longer in lonely places.


How I use the self-build composting toilet
This box composting toilet deliberately does not have a fan, as Manfred simply wants to use it in a portable way in his tent or caravan.
"So far, I have used my self-built composting toilet several times. The whole thing is in the cellar of my house, windows are deliberately closed. So far I only smell the litter, nothing else!"
"I spray the separet bowl (urine separator) with ½ vinegar / water - mixture and use normal toilet - paper for wiping, about every 5 times after use."
"The urine container used holds 13 litres. For the 2nd container I use 60l bags, which I can put nicely over the edge of the container."
"I got the container from OBI - as a laundry container with lid / medium size. It takes time to fill it."
"I use this composting toilet for my camping holidays. There the loo is under the canopy of my folding tent, privacy around and out in the open, I certainly don't need a fan!"
"Maybe it will be the second toilet for my holiday home. The box-separating toilet is easy to transport and can be placed exactly where I need it!"
"FYI: the opening for the thickness is LARGER when I don't use the insert from Separett! So just test it to see if it is needed."
"My cost material, without labour time, was about € 200.- in self-assembly."
This is how I built the composting toilet
Here I would like to briefly describe how my dry toilet for carrying is constructed:

I used a template and a Privy 500 divider insert to determine the size and heights.
Then I built a frame accordingly. With a corresponding insert board to fix the containers.


Material used for the camping toilet
- Base and lid made of MAX - synthetic resin board (washable, waterproof)
- Walls + container - support made of poplar - plywood
- Styrofoam - seat on Separett - Privy firmly glued (Styrofoam - glue used)
- Dimensions outside 50 x 60cm / height 53cm
- Separating insert: Separett Privy 500
- Bucket Obi
- PE canister with 13 L capacity


To the composting toilet accessories
How to find the right urine separator your composting toilet
Further points for the do-it-yourself construction of this composting toilet
- Make cardboard templates for both containers (simple tool)
- Match the urine container lid exactly to the Privy outlet (see photo)
- Adjust the height of both containers to the height of the toilet
- The containers are secured at the bottom with plywood and at the top with light pressure to prevent them from falling over
- The lid is held in place by the frame and secured in height by pins on the sides
- The lid can be lifted up by the protruding rim, no hinges necessary
- Reserve toilet rolls and bags are stored in the free space of the box
My cost of materials, excluding labour, was about €200 in DIY.
The two "knobs" visible in the photo are used diagonally as brackets. I also use them to carry the composting toilet.
I have a trailer with a lid + railing, on which is my folding tent, (see photo).
For my camping holidays I take this composting toilet with me. Now I am much more self-sufficient than before.
I use small animal litter, 2 - 3 fist sizes per toilet. It doesn't stink! Test the whole thing in my cellar, similar to your mobile home.
I thank Manfred Schweighofer from Austria for this detailed report. We will add to the blog article accordingly according to his experiences.
Pictures and text: Manfred Schweighofer, Voralberg, Austria