
Building instructions for a composting toilet in a motorhome

Many of our portable toilet blog readers or people interested in portable toilets are often desperate for detailed instructions on how to build a portable toilet.
They often find themselves at a loss in their motorhome bathroom, which is made entirely of cohesive plastic. It is not immediately obvious how to attach them.
Adolf took the trouble to document such instructions for converting the cassette toilet and published them on his website: www.blog.berzla.de.
He also allowed us to publish and link his construction manual of the composting toilet at MeineTrenntoilette.de. As usual, we have linked all the products mentioned.
Starting point
The shower tray in the Concorde motorhome was in need of repair. Adolf had been thinking about a composting toilet for some time, so he took advantage of the situation to convert the motorhome bathroom, including the cassette toilet.
To do this, he studied numerous videos and articles in order to deal extensively with the construction of a composting toilet.
A large bench toilet was installed in the Concorde motorhome, which took up a lot of space, as did the washbasin construction. The conversion was intended to free up a lot of space.
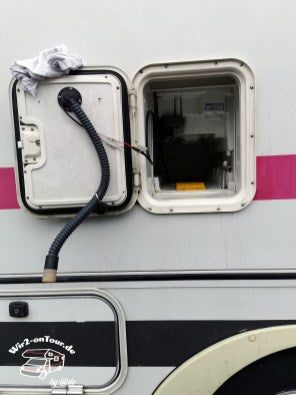
The idea was to continue using the existing service flap for removing the urine and solids tank. The existing power connection for flushing the old Thetford cassette and the SOG system were later to be used for the composting toilet.


Construction manual composting toilet
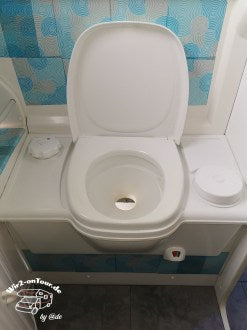
1. Removal of cassette toilet
First, the screws of the cassette toilet have to be found. Adolf looked at countless instructions on the internet to find out where to look for the screws.
Here we would like to refer to the article by Jonas, who took photos. You can find the link below this paragraph.
He located the screws in the cassette compartment. He also gave the hint that some bench toilets are additionally held with hooks in the rear area. Therefore, it makes sense to first lift the bench toilet upwards.
A small tip: remove the silicone joints beforehand and disconnect the water and electricity lines. Adolf was surprised how easy this work was.


Cassette out - conversion instructions | Cassette toilet conversion
2. Construction of the composting toilet
A first test construction was made from old chipboard.
The purpose of this was to be able to better estimate the dimensions of the containers, because, as already mentioned, Adolf wanted to be able to change the containers via the existing service flap. At the same time, they should allow for a maximum volume.
After the trial construction had determined the exact dimensions, Adolf procured the matching containers.
Tip from MeineTrenntoilette.de:
In our shop you can find coordinated do-it-yourself kits with compact containers. This saves you the time-consuming search for suitable canisters and buckets at different shops, including shipping costs.

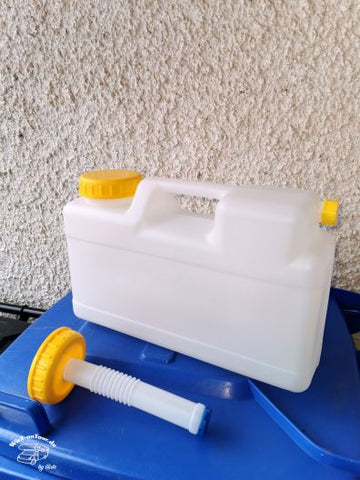

3. Used materials
On the one hand, every self-built composting toilet consists of the four standard parts (urine separator, urine canister, solids container + housing) and on the other hand, each one is ultimately individual and unique.
Therefore, the materials used always serve as orientation and nevertheless belong in every construction manual of a composting toilet.
- Separett Privy 400 separating insert
- 12 l wide neck canister
- Gastro waste bin
- Toilet seat with soft-closing mechanism
- Kitchen worktop in black (for seat)
- Chipboard for side walls
- Capacities Proximity sensor
The photos below show the construction, the internal division of the containers, as well as the fabrication of the seat.


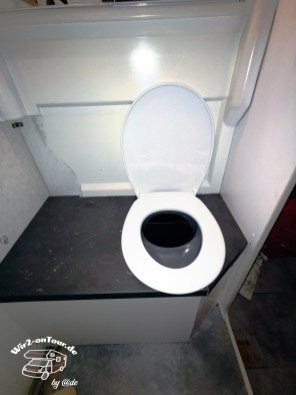
4. Construction of the composting toilet
The sawing template included in the delivery of the divider insert allows the divider insert to be cut to size. The divider itself has been adapted to the round shape of the toilet seat.
The urine canister can be pushed forward to be able to remove it.
The solids container was fitted with a door. After the internal layout fitted and everything was secured for the start of the journey, all that was missing was the seat or top cover of the composting toilet.
Adolf, as he writes, didn't have to worry about weight any more, so he opted for a black kitchen worktop as the cover and chipboard for the side construction.
Because of the slope, the worktop had to be made in two parts.
5. Special features for the construction manual of the composting toilet
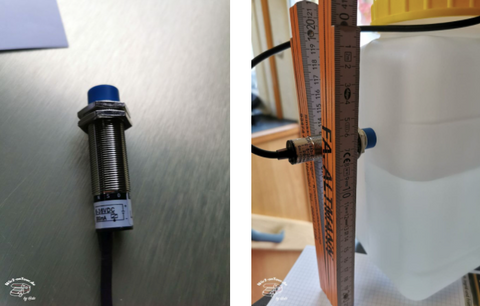
Through internet research, Adolf stumbled upon a component that was completely unknown to him before, as he wrote: Capacities Proximity sensor¹.
The special feature here is the contact-free reaction of the sensor to the approach of conductive and non-conductive substances.
It is therefore ideal for making the filling level of the urine canister optically visible with the help of a diode. Especially in Adolf's construction, such a sensor was ideal, because he had no way of looking at the urine canister from above and thus of seeing the fill level.
The test showed that the sensors react to the fill level.


In addition, he decided on an automatic ventilation system that is triggered by opening the toilet lid. For this, he also used the proximity sensors.
Adolf had support in implementing the electrical components from a friend who is an electronics specialist. He recommended that he obtain the following electronic equipment:
- 2 different Heschen capacitive proximity sensors (Note from Adolf: "There are 4 different versions, each differing only in the internal wiring, depending on the exact application for which they are needed. For this, the expert is needed, without whom my solution would not have been possible. In contrast, there are also inductive proximity switches that can be used for metallic objects.")
- 12 V time relay for up to 15 h overrun time of the fan
- Red LED lamps with resistor (Note from Adolf: "...this saves the extra work of soldering and calculating the resistor"
- Cables and small electronic parts
More detailed views


Adolf was not yet able to assess whether the fan strength, including suction power, is sufficient for the small hose diameter.
If necessary, he will adjust this later. Behind the toilet, you can see the sensor that activates the delay switch and fan when the toilet seat is opened.
The arrows show the installed proximity sensors for the fan and urine level. The former water pipe is equipped with a hose adapter and can be used for many purposes.
In the last picture, you can see the completely converted camper van bathroom.
Conclusion
This construction manual for the composting toilet including the conversion of the motorhome bathroom by Adolf is very inspiring.
With a bit of courage, manual dexterity and possibly an electrically experienced friend, a motorhome bathroom conversion can succeed optimally and be technically optimised.
The removal of the containers via the service flap cannot be implemented in every motorhome, as the dimensions of the service flaps vary greatly.
However, Adolf has shown with this construction manual for the composting toilet, starting with the construction up to the implementation, how it could be realised.
We would like to thank him very much for this. Please visit Adolf's website for more details on the bathroom conversion.
If you have built a composting toilet, don't hesitate to share it with us! But if you're still at the beginning and looking for inspiration, you'll find plenty of other building instructions and ideas for building your composting toilet here in the DIY reports.
If you don't feel like building your own composting toilet, there are also ready-made ones available for installation: