Turn old into new.... Defective motorhome toilet replaced by a composting toilet

Build your own dry composting toilet is becoming increasingly popular. More and more people are seeing the clear advantages of composting toilets.
Holger also decided to build a dry composting toilet himself after his cassette toilet broke down. He wrote a really great report on this, which I would like to share with you here.
Building a dry composting toilet yourself - Prehistory
The project was actually triggered by a leaking water connection in the chemical toilet. It might have been easiest to simply remove the thing and check all the connections.
But who wants to do it the easy way? A sensible hobbyist would rather sit down at the computer and research for hours!
I was quickly convinced of the concept of a composting toilet for ecological reasons, also with regard to the much-vaunted self-sufficiency.
The supposed main problem, however, was to convince my wife and son, especially as the annual holiday was just around the corner. But even this hurdle was overcome more quickly than originally anticipated. So the project "build your own dry composting toilet" was approved and I could start.
Bathroom conversion in the motorhome begins
For the construction, I was inspired by the very well-described building instructions from "//einraumwohnung.eu/selbstbau-anleitung-trockentrenntoilette/".
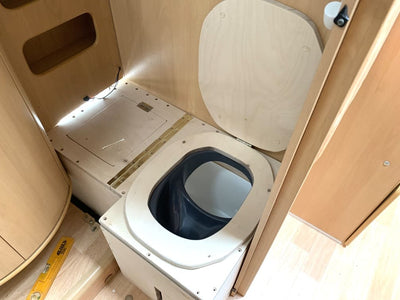
The biggest challenge, as with almost all motorhome projects, was to create full functionality in the smallest space. I preferred to measure several times and simulate one or the other test session. Visually, of course, the whole thing shouldn't necessarily look repulsive.
I had to make a small compromise on the depth. The lid, including the toilet seat, which has to be opened to remove the bins, cannot be opened completely over 90 degrees and leaned against the back wall.
To lock it in place, I simply hang the lid on a hook above it with a rubber cord.
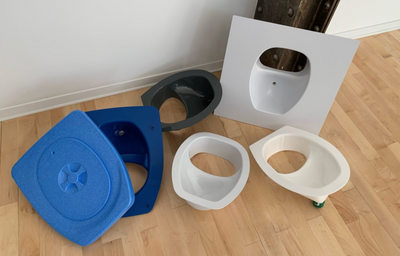
Material:
- 18 mm multiplex boards coated with melamine
- Hard wax
- S+T divider insert (no longer available, alternative: do-it-yourself set SB1)
- Urine canister
- Solids container


Build your own separate dry toilet - Let's go!
The material I used was an 18 mm thick multiplex board coated with melamine on both sides. I had already used it to build a new bathroom cabinet for the washbasin.
The advantage of the material is its enormous stability and the coating is simply ingenious, especially in the "wet area" of the camper van. I only milled off all visible edges at an angle and sealed them with hard wax.
Apart from that, it needs no further treatment. One disadvantage is the relatively high weight, which is not really suitable for a large-scale motorhome interior (with the exception of the 7.5 t class).
However, I also removed a few things and finally accepted a possible additional weight of maybe 3-4 kilos (incl. washbasin cabinet). Besides, our camper is loaded to 3.8 t, so I don't have to pay attention to every single kilo.


I milled about 5 mm of the separating insert into the panel so that the toilet seat lies flush on the wooden panel.
The urine container is a 10 litre wide-necked canister for which I built a small wooden box as a holder. The box is sealed on the inside with varnish and the edges with Sikaflex, making it watertight.
With the thickness of the base plate I regulated the height of the canister and it also serves as an emergency overflow (which will hopefully never be necessary). I was thus able to completely dispense with tubing.
A square waste bin from the IKEA empire serves as the solid waste container. It fit perfectly behind the canister and is only fixed by 4 squared timbers.
A 12 V connection was already on site to control the Thetford toilet flush. I used this to power the fan, which can be switched via an illuminated button in the front panel.
I placed the fan, a whisper-quiet part from the PC sector, in the disposal flap and covered it from the outside with a stainless steel screen. Initially, I had integrated an activated carbon filter into the opening, but it seemed to have minimised the air flow to zero.
Praise and recognition
Since there have been no complaints about odours so far, the fan will remain outside for the time being. The outlet in the floor for the air heater is now completely covered.
For this, I had to order an adapter and some flexible heating pipe in the accessories and integrate a new air outlet into the front panel.
Finally, I built an outdoor shower out of the water connection that was no longer needed and received some praise for it from the rest of the family on the subsequent trip to Croatia.


However, the shower again prevents the disposal of the containers to the outside via the flap, but there is always something. But since the buckets and canisters have lids and the path from the bathroom to the outside is only about 2 m, this is also acceptable.
Conclusion: Build your own dry composting toilet
All in all, we are now completely convinced of the concept of a composting toilet. The bathroom also looks good now, but that's always a matter of taste.
Comments from meineTrenntoilette.de
An absolutely successful result of a composting toilet and even with an outside shower! The project: "Build your own dry composting toilet" has resulted in a very nice motorhome bathroom here.
Thank you Holger for your report!
If you have any further questions about the dry composting toilet, please do not hesitate to contact me. You can find all the accessories for building your own composting toilet here in the shop.
Popular posts